
Stephanie Chan of Silly Precious Piggies shares this great DIY tutorial for hair pins with Artfully Wed. It’s a lovely project any bride can try if she wants to add a special handmade touch to her wedding.
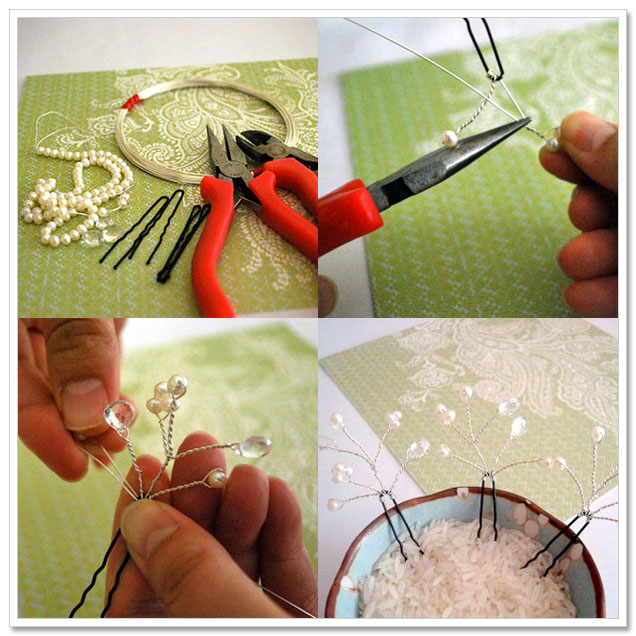
Materials –
- Hairpins: U-shaped hairpins are the easiest to work with and you can wear these in an updo. For those with finer hair (or short hair like me), you can use regular bobby pins. Combs, barrettes and tiara forms also work well.
- 26-gauge wire: I’m using sterling silver, but you can also use silver-plated or other metals, plus less-expensive craft wire from your local craft chain store (great for practicing). 28-gauge can be used, too (bigger number=thinner wire), but might break more easily. If you go too thick, it will be difficult to work with the wire.
- Beads: Depending on the look you want to achieve, you can use all the same bead or an assortment.
- Wire cutters and flat-nosed pliers: Nothing fancy needed.
Instructions –
We’ll be making hairpins with pearls and crystal quartz teardrop beads.
1. For this design, cut about 18 inches of wire. Leaving a little tail at the end (about 3/4 inch), start wrapping the wire around the hairpin. Go around about 3 times. Use the pliers as you go, to tighten the wire around the hairpin. Snip off the tail end and use pliers to flatten the end against the hairpin and scoot the coil over towards the side.
2. Now we’ll start making the branches. Thread one pearl onto the wire and stop about 1 inch above the hairpin. Curve the wire 180 degrees so that the pearl is at the top of the upside-down U. Make sure there’s an equal length of wire going “up” to the pearl as there is going back “down” to the hairpin. The “down” end should be on the opposite side of the hairpin as the “up” end, so it looks like two legs straddling the hairpin. The straddle will help secure the branch to the hairpin.
3. In one hand, grasp the hairpin as well as the “up” and “down” ends of the wire. Then start twisting with the other hand. Twist gently and and with even movements. Keep going until you can twist no more. It does not have to be perfect… trees in nature are beautiful but no two branches are alike! To start the next branch, loop the wire underneath the hairpin curve so that the wire starts going “up” again.
4. Now we’re going to make a branch with three sprigs. One sprig will have a “clover” of three beads. Thread three beads about 1/8 inch higher than the first branch’s bead, and as before, curve the wire 180 degrees to form a U, with the middle bead at the top. Pinch the two side beads together to form the clover. This time, we’re going to twist only halfway down the wire. Grasp the wire with pliers with one hand and grab the three beads with the other hand. Twist until you reach the pliers and stop.
5. Gently bend the wire up again and create the 2nd and 3rd sprig of this branch. I used a teardrop shaped bead and a single bead. Twist only until you meet the first sprig.
6. To form the supporting branch, straddle the two wires around the hairpin. Grasp the hairpin along with the two wires in one hand. With the other hand, grasp the point where the three sprigs meet and twist until you can’t twist anymore.
7. Loop the wire underneath the hairpin. Make two more single branches, making one with a teardrop and one with a clover of 3 beads.
8. To finish, wrap the wire around three times and trim. Use your pliers to straighten and tighten the coils around the hairpin.
9. Gently maneuver the branches and sprigs so that it looks natural.
Photos and instructions courtesy Stephanie Chan